Learn new technologies tricky concepts in PHP yes it is Framework C Java System programming coffee script server side scripting Augmented reality Develop Facebook Applications Cloud Applications JavaFX Java Framework PHP Framework
With over 1 billion Android devices already activated, Android represents an incredible opportunity for developers.
The skills you learn in this course will help you build awesome apps for smartphones and tablets today, and propel you towards exciting opportunities in Android's future.
Before start exploring Android Studio, you'll first need to download and install it. Note that you need to have JDK 6 or higher installed and have the environment variables set as shown below.
Java Environment Set up
1)Go to My Computer properties
2)click on advanced tab
3)click on environment variables
4)click on new tab of user variables
5)write path in variable name
6)Copy the path of bin folder
7)paste path of bin folder in variable value
8)click on ok button
9)click on ok button
Now your java environment is set.You can now execute any program of java from any drive.
Android Studio Set up
If you're on Windows, launch the.exe file and follow the steps of the setup wizard. If you're running OS X, mount the disk image by double-clicking it and drag Android Studio to your Applications folder.
If you've successfully completed the above steps, then your development environment should be set up correctly. You're now ready to create your first Android application using Android Studio. When you launch Android Studio for the first time, you should be presented with a welcome screen, offering you a number of choices to get you started.
In this tutorial, we're going to choose the New Project option. However, you can choose Import Project if you'd like to import a project from, for example, Eclipse, into Android Studio. Android Studio will convert the Eclipse project to an Android Studio project, adding the necessary configuration files for you.
If you select Open Project from the list of options, you can open projects created with either Android Studio or IntelliJ IDEA. By choosing Check out from Version Control, you can check out a copy of a project that's under version control. This is a great way to quickly get up to speed with an existing project.
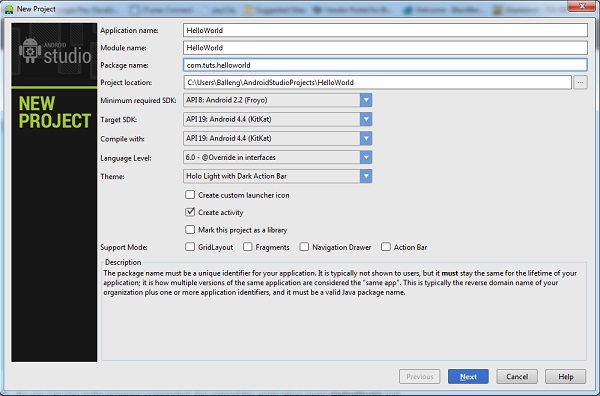
To get us started, choose New Project from the list of options. This will show you a list of options to configure your new project. In this tutorial, we're going to create a simple application to show you some of Android Studio's most important features. I'm sure you agree that there's no better name for our project than HelloWorld.
As you can see in the above screenshot, I've named my application HelloWorld and set the module name to HelloWorld. If you're unfamiliar with IntelliJ IDEA, you may be wondering what a module is. A module is a discrete unit of functionality that can be compiled, run, tested, and debugged independently. Modules contain source code, build scripts, and everything else required for their specific task.
When creating a new project, you can also set the package name of the project. By default, Android Studio sets the last element of the project's package name to the name of the module, but you can change it to whatever you want.
The other settings are the project's location on your machine, the minimum and target SDK, the SDK your project will be compiled with, and the project's theme. You can also tell Android Studio to create an Activity class and a custom launch icon for you, and whether the project supports GridLayout, Fragments, a Navigation Drawer, or an Action Bar.
We won't create a custom icon for this application so you can uncheck the checkbox labeled Create custom launch icon. Click Next to continue setting up your project.
Because we checked the checkbox Create activity in the previous step, you are asked to configure the Activity class Android Studio will create for you.
Since we'll be starting with a blank Activity class, you can click Next to proceed to the next step in the setup process in which you're asked to name the Activity class, the main layout, and the fragment layout. You can also set the navigation type, which we'll leave at None for this project. Take a look at the next screenshot to see what your settings should look like.
After clicking Finish, you'll be presented with Android Studio's user interface with the project explorer on the left and the workspace on the right. With your project set up in Android Studio, it's time to explore some of the key features of Android Studio.
2. Android Virtual Devices
An Android Virtual Device or AVD is an emulator configuration, allowing you to model an Android device. This makes running and testing applications on a wide range of devices much easier. With an Android Virtual Device, you can specify the hardware and software the Android Emulator needs to emulate.
The preferred way to create an Android Virtual Device is through the AVD Manager, which you can access in Android Studio by selecting Android > AVD Manager from the Tools menu.
If you're development environment is set up correctly, the Android Virtual Device Manager should look similar to the screenshot below.
To create a new AVD, click New... on the right, give the AVD a name, and configure the virtual device as shown below. Click OK to create your first AVD.
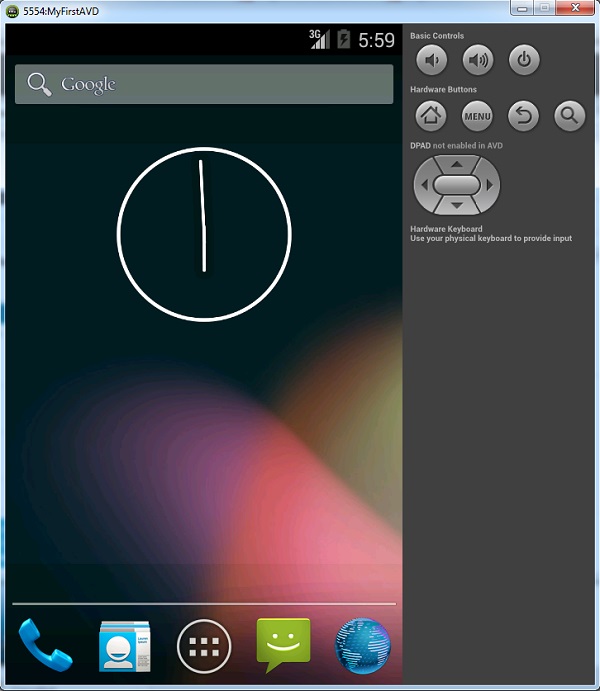
To use your newly created AVD, select it from the list in the AVD manager, and click Start... on the right. If your AVD is set up correctly, the Android Emulator should launch as shown in the screenshot below.
With the Android Emulator up and running, it's time to launch your application by selecting Run 'helloworld' from the Run menu. That's how easy it is to run an application in the Android Emulator.
Conclusion
In this tutorial, we've taken a brief look at some of the key features of Android Studio. It is very similar to IntelliJ IDEA, but it contains a number of important enhancements that make Android development easier, faster, and more enjoyable.
2. Download and Install Node.js from here for windows and Linux users install using sudo command.
3. Download Ant from here
Extract and Add path to the ant\bin to your PATH variable.
Ex: I have extracted to apacheant folder so am adding this to my path variable ; C:\apacheant\apache-ant-1.9.2\bin
Now you have Ant configured.
After you configure above properly check typing javac --version, Ant and npm to make sure you have
configured it properly.
when typed above commands it should not output "'**** is not recognized as an internal or external command,operable program or batch file".
Now install cordova by typing
sudo npm install -g cordova
Note: windows users type with out sudo keyword.
This will install cordova.
what is cordova?? That's a obvious question.
Cordova is API by apache previously called PhoneGap, which contains many libraries or api functions to program easily with out using specific sdk.
It also has build on cloud option, using this we can build application targeting any platform with out downloading any sdk of any platform.
So now you got some idea right !!!
Once you install cordova as shown above, create a cordova app
where hellowetechies is display text and com.example.cordova is domain name or package name and wetechies is a folder name which will contain HTML, css files platforms etc.
Now two things can be done 1. Developing the application by editing HTML and CSS files and building remotely for any platform and downloading apk or platform specific file then check on your phone 2. Download sdk of platform which you want to target importing project into eclipse and developing where you can use emulator to check you application.
In this post am going to show how to use first method :)
So after creating a project, you have to change directory (go inside the directory)
cd wetechies
Compress the wetechies folder in zip format ( currently rar is not accepted)
Now after signing in click on +new app and click on private tab.
Click on upload .zip file and select you compressed file and upload.
After uploading is compeleted you can see that app in apps sections and click on Ready to build.
Click on the platform you need to target
For demo purpose I selected Android, second from left
As I selected android as my platform, It has build for android and also for windows,hp,i.
You can click on specific platform extension like for android on apk file to download and test it on
your phone.
As you have got error for ios and others, you can click and fix it, you will be guided to fix it as building ios applications is quite different from rest.
Once you install and run on your phone, you can see the demo application created by phonegap you can edit and further proceed by following there api documentation at phonegap.com.
happy blogging :)
Ask us if you have any doubts or stuck with anything :)
Follow this post if you want to start up with some basic information regarding C library .
In this post you will be creating your own library and also be using it in your own program , the post will also demonstrate the use of the ar(archive) command.
Lets start Creating and using our library
STEP 1 :- Lets create two files for demonstration .
File 1 } myadd.c
#include<stdio.h>
int myadd(int a , int b)
{ int res; res = a + b;
return res;
}
File 2 } mysub.c
#include<stdio.h>
int mysub(int a , int b)
{ int res; res = a - b;
return res;
}
STEP 2 :- Lets create object codes of the above two c codes
gcc -c myadd.c
gcc -c mysub.c
Follow this post to get some more information about the above command.
STEP 3 :- Lets create our header file having the prototypes of the myadd() and mysub() functions.
myheader.h
#include<stdio.h>
int myadd(int a , int b);
int mysub(int a , int b);
STEP 4 :- Lets create the library file using the ar command .
We specify the name of the library file and the object codes to be grouped together as a library as the arguments to the ar command .
ar cr mylib.a myadd.o mysub.o
The GNU ar program creates, modifies, and extracts from archives. An archive is a single file holding a collection of other files in a structure that makes it possible to retrieve the original individual files (called members of the archive). The option c creates the archive and the option r inserts the files into the archive by replacing any previouly existing members of the archive .
To view to contents of the mylib.a file we can use the following command
ar t mylib.a
STEP 5 :- Congrats you have created your library , Now lets write our own program with the library we created.
my_program_with_myheader.c
#include"myheader.h"
int main()
{
int res;
res = myadd(10 , 20);
res = mysub(50 , 20);
printf("The result after addition is %d\n",res);
printf("The result after subtraction is %d\n",res);
}
You can see the myheader.h file created by you being used in the program .
In simple terms - a library is obtained by grouping multiple compiled object code files . Libraries are also know as shared components or archive libraries .
When to create/use library?
A library can be created when ever you have some functions or any piece of code that will be used by many applications .
Instead of rewriting that piece of code in every application repeatedly , you can just include the library in a single statement .
Seems to be useful??? read further
Types of libraries
In linux there are 2 c/c++ library types
1 } Static Library - These are files that have the .a extension ( .lib in windows ) . The static library is linked into the executable during the link time . All the codes related to the library will be in this file . A program that makes use of the static library file will take all the codes that uses from the static library and will make it as a part of the program itself.
2 } Shared/Dynamic Library - These are files that have the .so extension ( .dll in windows ) .This can be used in 2 ways .
a } Dynamically linked at run time . The shared objects will not included to the executable component but it will be tied to the execution .
b } Can be loaded and unloaded during execution using the dynamic linking loader system functions .
Hello here is a simple but interesting and useful topic .
Do you want to know how to create object files and link them together to create an executable files??
Well , your in the right place !!!!!
In this post we will be making use of the gcc compiler .
We will create two files
1 } wetechies.c - does not contain the main function but has the implementation of the add function .
2 } wetechiesmain.c - has the main function and calls the add function present in the wetechies.c file .
Here is the wetechies.c file
#include<stdio.h>
int add(int c , int d) { int result;
result = c + d;
printf("\n\nwetechies.c file has been called\n");
printf("\n\nThe result after addition is %d\n",result);
return result; }
And here is the wetechiesmain.c file
#include<stdio.h>
int main() { int a , b ;
printf("\n\nwetechiesmain.c file has been called\n\n\n");
printf("Enter the two numbers to be added\n");
scanf("%d %d",&a,&b);
add(a,b); }
Now we need to convert the above c files into object files .
We do this by using the gcc compiler using the -c option which compiles or assembles the source files, but does not link them. The linking stage simply is not done. The ultimate output is in the form of an object file for each source file.
Now lets see the steps to create the object files and link them to create the final executable file> .
Step 1 : We create the object file (wetechies.o) file using the following command
gcc -c wetechies.c
The above command will create the wetechies.o object file .
The ls command can be used to check the contents of a directory .
Step 2 : We create the object file (wetechiesmain.o) file using the following command .
gcc -c wetechiesmain.c
The above command will create the wetechiesmain.o object file .
Step 3 : In this step we will link the two object files that we created in the above two steps in order to create the final executable file .
The -o option used along with the gcc command will place output in file wetechies_executable . This applies regardless to whatever sort of output is being produced, whether it be an executable file,an object file, an assembler file or preprocessed C code. When you link a .o file, its contents are copied into the program, whether you call the routines in it or not.
The above command will create an executable file with the name wetechies_executable .
We execute the executable file as below
./wetechies_executable
The below figure shows the whole procedure .
Congrats you have obtained the correct output even though you have called the function in one file and got the implementation of it in another file !!!!!!!
It all happened because you created the executable file by linking two objects files .
Thats it !!!!
Leave your doubts and suggestions in the comments section .
Have you ever thought how to send mail in PHP with out using mail() ?
I know you would have used mail() in PHP, then you should also know limitations of it.
Setting/configuring your outlook,mercury,thunderbird to use mail() is an hurdle and it doesn't
provide much flexibiity too.
Do you know there are many libraries to send mail? indeed power full libraries like
phpmailer, swiftmailer.
These classes or libraries have been written to make sending mail using PHP easier
and send mail with more flexibility and features.
In this demo am going to use phpmailer class as swiftmailer is also good but I prefer and
recommend phpmailer because swiftmailer class has not been updated recently and where phpmailer has good documentation and new releases are always on the way.
$mail->Subject = "hi (PHPMailer test using SMTP)";
$body="Sending mail by using wetechies post on How to use Gmail SMTP to send mail \n";
$mail->WordWrap = 80;
$mail->MsgHTML($body, dirname(__FILE__), true); //Create message bodies and embed images
//you can also add attachments to your mail but change file path
//$mail->AddAttachment('images/phpmailer_mini.gif', 'phpmailer_mini.gif'); // optional name
//$mail->AddAttachment('images/phpmailer.png', 'phpmailer.png'); // optional name
To send to other change $mail->to =" to_whom_you have to send";
If you don't want to take hurdle of writing script don't worry phpmailer helps you in that too.
What? Yes! it generates code for you!!! Amazing right
Once you download phpmailer class go to phpmailer/examples/ check for codegenerator.phps
Change .phps extension to .php run that file, fill out all the details
Now fill up your google account details
SMTP Port - 465
SMTP Server - smtp.gmail.com
SMTP Security - ssl
SMTP Authentication check yes
Provide your username and password of google and click submit.
that's it!!! you are done it gives you the PHP script if authentication is successfull.
you can just run that code and send send the mail.
the generated script just include that in your PHP file :)
You are done, Now send mail to anyone with n no of attachments happily :)
I'm sure you would have struggled to convert your Document(doc) file into Portable Document File(pdf) by searching for a converter software and other mean.
Why don't you create a PDF file by your own .
YES you can do it using PHP , want to try ??? Its very simple !!!!!!
For this purpose we make use of FPDF --->FPDF is a PHP class using which you can generate PDF files with pure PHP, that is without using the PDFlib library where F stands for Free
FPDF has a lot of advantages and excellent features .
$this->SetFont('Times','B',18); //prototype of the setFont function is SetFont(string family [, string style [, float size]])
$this->SetY(0.5);// Moves the current abscissa back to the left margin and sets the ordinate. If the passed value is negative, it is relative to the bottom of the page.
Hi , Ever thought of writing your own php code for compressing and extracting your files
??
Then your in the right place , by following this post you can zip and unzip your files using a PHP code
. You can also perform other operations like renaming the files to be zipped , getting the index of the file to be zipped , extracting the zipped files to the folder you wish , getting the number of files zipped and the name of the files being zipped etc :-)
Excited ? well here it goes !!!!!!!!!!
Create and Extract zip files using your own PHP program
<?php
$zip = new ZipArchive(); /*creating a variable of the zipArchive class*/
$filename = "./wetechies.zip"; /*name of the zip folder you want to create*/
Compress your files using PHP
/***************Creates the zip folder if it doesn't exists , else it overwrites ***************/
if ($zip->open($filename, ZipArchive::CREATE)!==TRUE) {
exit("cannot open <$filename>\n");
}
/****************** Lets add 2 files into the zip for demonstration********************/
$zip->addFromString("wetechies1.txt" . time(), "#1 welcome to wetechies blog.\n");
$zip->addFromString("wetechies2.txt" . time(), "#2 enjoy reading the blog.\n");
/***********************Just to print some archive details*****************************/
When we learn a new language we will leave some good concepts in that by mistake..
Don't worry here is a short post for you about this
Heredoc was introduced to store large or long text in a variable.
We could do that with a ordinary variable also?
Advantage with heredoc is we can freely use single or double quotes, where ever you need with out a need to remove its special meaning using black slash.
Just use a delimiter which ever you like to specify start and end of the text.
Ex:
$myheredoc=<<<delimiter
hi,welcome to "wetechies blog",
Thanks for visiting :).
delimiter;
ps: the use of word delimiter is to state the start and end of the
text. Replacing it with any word will not be a problem.
Now if you echo $myheredoc
You will see whole text you have stored..
Impressing right?
Any doubts? or suggestion please feel free to comment :)
You are done with installing yii framework plugin in netbeans
Now to create a site,
click File -> New Project -> PHP -> PHP Application
Then select your localhost folder then click next untill you are prompted to select PHP Frameworks
Select yii Framework !!
Thats it :) You have created a new site yourself feel happy :)
Now a basic introduction to structure of yii, As it is MVC pattern framework
All site control (Actions,Sql commands) will be in controller files - Protected/Controllers
All logic (access controls,restrictions, validations) will in model files - Protected/models
All files which the user can see (login page, registration page,home page) will be called view files
-Protected/views
This makes things clean and safe and powerfull yii library makes life easier :)
Next thing is when you developed your site and want to host it, make sure you have changed this line
yii='E:\yii-1.1.13.e9e4a0\framework\yii.php';
to point to your current framework location in protected/config/main page :)
Thats all folks :) Now you too a web developer !!!
leave your doubts or suggestions in comments section..
Hi Having been obtained a fair enough knowledge about cloud from the previous post . I am sure you would want to experience the power of cloud by exploring yourself to the cloud . Here you will learn the basics required to create your own cloud based application . You may create a commercial app/ game app/ educational app etc , the basic set up that is to be done is more or less the same just with slight changes depending on your requirement . Here you will be setting up your development environment in the salesforce.com which is one of the cloud service provider , you can choose some other provider like the amazon / vmware / openstack / cloudstack etc Here it goes !!!!! Step 1 : Yes its obviously the registration process . Get yourself registered from here .
Step 2 : Congrats you have actually completed the set up required . Now to start using your account in an useful way , read step 3. Step 3 : Once you have logged in using your account , you can use your cloud environment in three perspective 1 } Administrator 2 } Developer 3 } Monitor
As an administrator you can perform a wide range of critical/interesting operations like
Manage Users
Manage Apps
Company Profile
Security Controls
Communication Templates
Translation Workbench
Data Management
Mobile Administration
Desktop Administration
Email Administration
Google Apps Being a developer you have options to Create your own cloud application
and customize it as you wish for your purpose .
In the perspective of a monitor you have the following options
System Overview
Imports
Case Escalations
Mass Emails
Step 4 : What else... customizing your cloud environment for your application .
Creating the Objects
To create the objects go to Your user Name, located in the upper-right corner of the Main page. Select Setup from the list.
Click on Create and click on Objects and click next and fill in the necessary details in the next page .
Step 5 : Similarly you can create your own customized tabs and invoice objects and expand the power of your application to a wide range of areas .
Please feel free to leave your comments or doubts.....